Showing posts with label crafts. Show all posts

Tuesday, August 13, 2013

13 DIY Ideas for Back to School


It is hard to believe that the summer has gone by so fast!  Here are some fun last minute projects to help you be prepared to face the school year.


Pack a laugh in your child's lunch!  Print out these fun Lunch Bag Jokes here.


Homemade Chocolate Dipped Granola Bars are one of our favorites!  They are quick and easy to make and are ideal to pack into your kid's lunch box or make for an after school treat.


Do your kids take lunch money to school with them?  Follow this step-by-step tutorial to make these original and adorable Monster Money Pouches.


Being organized is essential to having a stress free school year.  Create your own Homework station with these Free Homework Station Printables!


Maybe your child is like mine, and they don't need a large backpack.   Make this fun  Backpack from a Pair of Pants for just the perfect child-size tote.


Everyone loves Dr. Seuss!!  Here is a fun printable and party theme "Going Places" Back to School Party.


Encourage your child to stay on the reading path by creating these Fun Photo Bookmarks.  They won't be able to resist these!


Go Everywhere Mini Messenger Bag is excellent for carrying all those little essentials without having to tote around something larger.  With it's long strap and small size, you'll even forget you're carrying it.


Want to end summer with a party and a bang?  Check out these Back to School Party printables.


Kids love treats.  These Irresistibly Healthy Oatmeal Cookies have lots of protein and fiber.  Plus the amount of sugar is about the same as a flavored yogurt.  They'll love finding these in their lunches.


Kids love to use the computer.  Why not take advantage of that and help them learn at the same time?  Here are 10 Great Educational Websites for Kids.


Stretch your creative potential and make one of these personalized Felt Bookmarks made from a stretchy headband.


Does your child use an iPad for school?  Here is an easy tutorial for The 50 Cent DIY iPad Stand.  It is very sturdy and it can be used with a case. Great for hands-free reading!

So there you have it!  I trust that your children have an awesome and blessed school year.

Friday, August 9, 2013

Dog-Gone Easy Dog Toy


Dogs can have fun with almost anything.  So can kids for that matter.  Here is a fun dog toy for kids to make from their own t-shirts!


We have come to the end of summer vacation.  Today is our last Summer Fun {Kid's Edition} project.  It has been a lot of fun creating memories with the kids this summer.


Dog-gone Easy Dog Toy

This project is so quick and easy you could complete it in about 5 minutes.  You can make 4-5 toys with 3 different t-shirts, or you could make 1-2 toys with just one t-shirt.

1.  Since there are three kids in our family, I had each of them grab an old t-shirt that either didn't fit them any more or that had stains on it.  In their language, "One of those shirts I always tell you to take off and change for a nicer looking shirt."  They knew immediately which ones to grab.  


2.  If your kids are old enough to cut fabric, have them cut off the bottom of the shirt just above the hem line.  Toss that, or give it to your kids to play with.

3.  Now, cut a 2" strip from the bottom of the t-shirt.  Cut the strip so that it is one long piece and not a circle.

4.  Repeat steps two and three with the other two shirts.

5.  Now take the three strips and tie them together with a knot at the top of the strands.  Leave about a 3" tail at the top.  

6.  Have one kid hold the strands and have another one begin to braid them.  Stop at about 5" from the bottom.  Tie another knot to secure the braid. 

7.  Trim the tails so they are even.  You're done!!


Have fun!!


I Link up Here


Other activities in the series...

Friday, July 12, 2013

Fun Photo Bookmarks


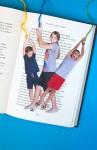
Fun photo bookmarks to use or to give as gifts.  The best part about making these bookmarks was posing for the photo shoot. :)  


Even though summer is almost half over, there are still plenty of days to get in all that summer reading. Here is a fun idea to keep kids motivated to keep up the good work.  These bookmarks are super fun to create and don't take a lot of supplies to make.

Start out with a relaxed photo shoot.  Grab your camera or camera phone and have the kids pretend that they are climbing or hanging from a rope.  Make sure to get their whole body for the best effect and encourage them to be dramatic!

Once a perfect pose has been settled on, print out the pictures.  If you have access to contact paper, I recommend laminating them before you cut them out. Now, on to the next step - the tassel.  Here is how to make your own...


DIY Tassel

Supplies

- Embroidery floss
- Large needle
- Piece of cardboard 2" x 5"
- Scissors

First, take the piece of cardboard and fold it so that it is now 2" by 2 1/2".  Begin wrapping the embroidery floss around the height of the cardboard.  I wrapped mine about 20 times.  Next slip the scissors through the open part of the folded cardboard and cut the floss.  

Slip off the floss carefully and lay it out flat.  There should be about 20 pieces of  2 1/2" string.  Take a second piece of embroidery floss about 14" long.  Tie one end of the 14" piece around the center of the 2 1/2" group, creating a center fold.  Leave one end about 10" long and the smaller end about 4" long.  Tie it a second time to make sure it is secure.  

Now take the longer end of the 14" piece.  Stretch it up and then loop it back down to the tassel.  Tie a little knot at the top of the tassel.  Tie a second time to make sure it is secure.  

Take the smaller end of the 14" piece and wrap it around the tassel creating a head.  Tie securely two times.  Then take the needle and slip the end down through the wrapped around part to slip right in with the rest of the tassel.

To finish the bookmark, poke a hole with a large needle through the hands.  Finally, loop the tassel through the hole.   


I Link Up Here


Other fun kid activities in the series:


Friday, July 5, 2013

Homemade Self-Hardening Clay


My kids had a lot of fun with this homemade self-hardening modeling clay.  It is really easy to make!


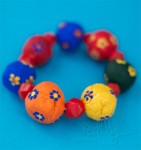
A bracelet made with clay.  We call it Bedrock jewelry :)

Kids love to play with clay.  You can create as much as the imagination allows.  Self-hardening clay is extra fun because your creations can be preserved forever.  Plus, you get to further personalize by painting with bold bright colors!

Recipe for Self-Hardening Clay


4 c flour
1 tsp alum (found in the baking isle)
1 1/2 c salt
1 1/2 c water


Mix all the ingredients together.  Divide into sections.  If you are not going to use it right away, you can store it in a sealed zip lock bag in the fridge.

Tyler's Penguin, Flip

Allow the art to dry for about 2 days at room temperature.  Then use watercolors or acrylics to paint to your hearts content.  :)


Happy Creating!!


Other fun kid activities in the series:


I Link Up Here