

My kids had a lot of fun with this homemade self-hardening modeling clay. It is really easy to make!
 |
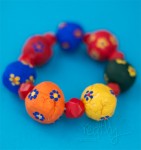
| A bracelet made with clay. We call it Bedrock jewelry :) |
Kids love to play with clay. You can create as much as the imagination allows. Self-hardening clay is extra fun because your creations can be preserved forever. Plus, you get to further personalize by painting with bold bright colors!
Recipe for Self-Hardening Clay

4 c flour
1 tsp alum (found in the baking isle)
1 1/2 c salt
1 1/2 c water
Mix all the ingredients together. Divide into sections. If you are not going to use it right away, you can store it in a sealed zip lock bag in the fridge.
 |
| Tyler's Penguin, Flip |
Allow the art to dry for about 2 days at room temperature. Then use watercolors or acrylics to paint to your hearts content. :)

Happy Creating!!


I Link Up Here